To build drawers in a closet, measure the space, choose suitable materials, and assemble the drawers. Ensure the drawers fit well in the closet, and use quality hardware for smooth operation.
Building drawers in a closet can be a practical solution to maximize storage space and keep items organized. Whether you’re looking to create custom storage for clothes, accessories, or other belongings, drawers can offer a convenient and versatile storage solution.
By following the right steps and using the proper materials, you can create functional and aesthetically pleasing drawers that enhance the functionality of your closet. In this guide, we will explore the essential steps and considerations for building drawers in a closet, allowing you to optimize your storage space with a personalized touch.
Planning Your Closet Drawer
When building drawers in a closet, the first step is Planning Your Closet Drawer. This involves measuring the closet space, determining the drawer sizes, and ensuring everything fits perfectly. Let’s dive into how you can efficiently plan your closet drawer.
Measuring The Closet Space
Start by Measuring the Closet Space you have available for the drawers. Utilize a measuring tape to determine the width, depth, and height of the closet area where you intend to install the drawers.
Determining The Drawer Sizes
Next, focus on Determining the Drawer Sizes that will best fit within the closet space. Consider the items you plan to store in the drawers to determine the appropriate dimensions. Make sure the drawers are wide and deep enough to accommodate your belongings.
Gathering The Materials And Tools
Before you start building drawers in your closet, you need to gather the necessary materials and tools. This step is crucial to ensure a smooth and successful project. Let’s walk through the process of Gathering the Materials and Tools for building drawers in a closet:
Choosing The Right Wood
When selecting wood for your drawers, opt for durable and sturdy options like birch or maple for longevity.
Selecting Drawer Slides
For smooth operation, consider full-extension drawer slides to maximize accessibility and functionality in your closet drawers.
Getting The Necessary Tools
- Measuring tape to ensure precise dimensions
- Saw for cutting the wood accurately
- Drill for assembling the drawers
- Screwdriver to secure components
- Sandpaper for a smooth finish
By having the right materials and tools on hand, you can streamline the process and create functional and aesthetically pleasing drawers in your closet.
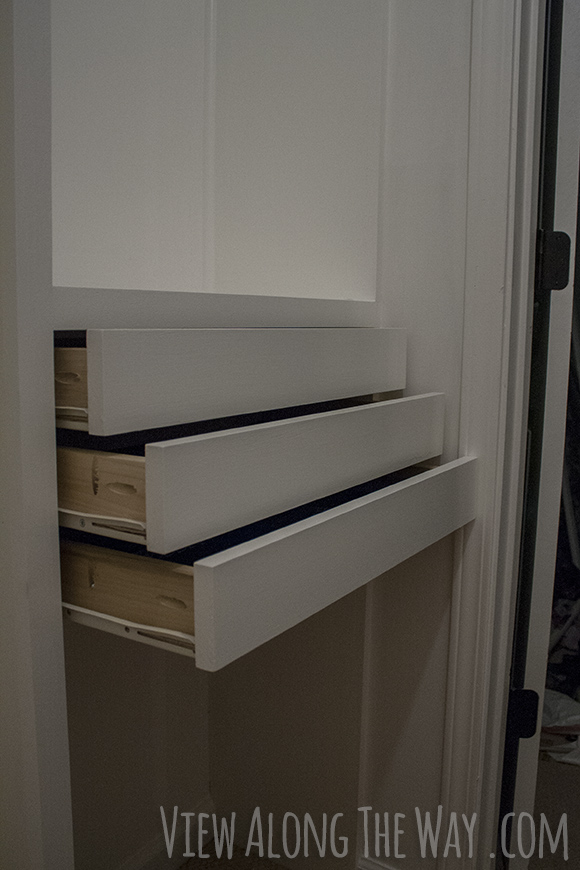
Preparing The Closet For Drawers
Before you can start building drawers in your closet, it’s important to properly prepare the space. This involves clearing out the closet, marking the locations for the drawers, and ensuring that everything is ready for the construction process. In this section, we will guide you through each step in detail.
Clearing The Closet Space
The first step in preparing the closet for drawers is to clear out all the items and clutter in the space. This is especially important if your closet is already filled with clothes, shoes, and other belongings. Clearing out the space will give you a clean and empty canvas to work with.
To make the process easier and more organized, consider sorting through your items and deciding which ones you want to keep, donate, or discard. This will not only free up space in your closet but also give you the opportunity to declutter and organize your belongings.
Marking The Drawer Locations
Once the closet is cleared, the next step is to mark the locations for your drawers. This will help you visualize how the drawers will fit into the overall design of your closet and ensure that they are properly aligned.
To mark the drawer locations, measure the width and height of your closet space and divide it into equal sections. For example, if you have a 6-foot-wide closet, you may decide to have three drawers, each measuring 2 feet in width.
Using a pencil or chalk, make marks on the walls or floor of the closet to indicate where each drawer will be placed. This will serve as a guide when you start building the drawers and ensures they fit seamlessly into the closet.
Remember to consider the height of the drawers as well. If you plan on hanging clothes above the drawers, make sure to leave enough space between the top of the drawer and the bottom of the hanging rod.
It’s a good idea to double-check your measurements and markings before proceeding to the construction phase to avoid any costly mistakes.
By clearing the closet space and marking the drawer locations, you are now ready to move on to the next step in building drawers in your closet. In the next section, we will guide you through the process of actually constructing the drawers to complete your closet transformation.
Credit: www.homedepot.com
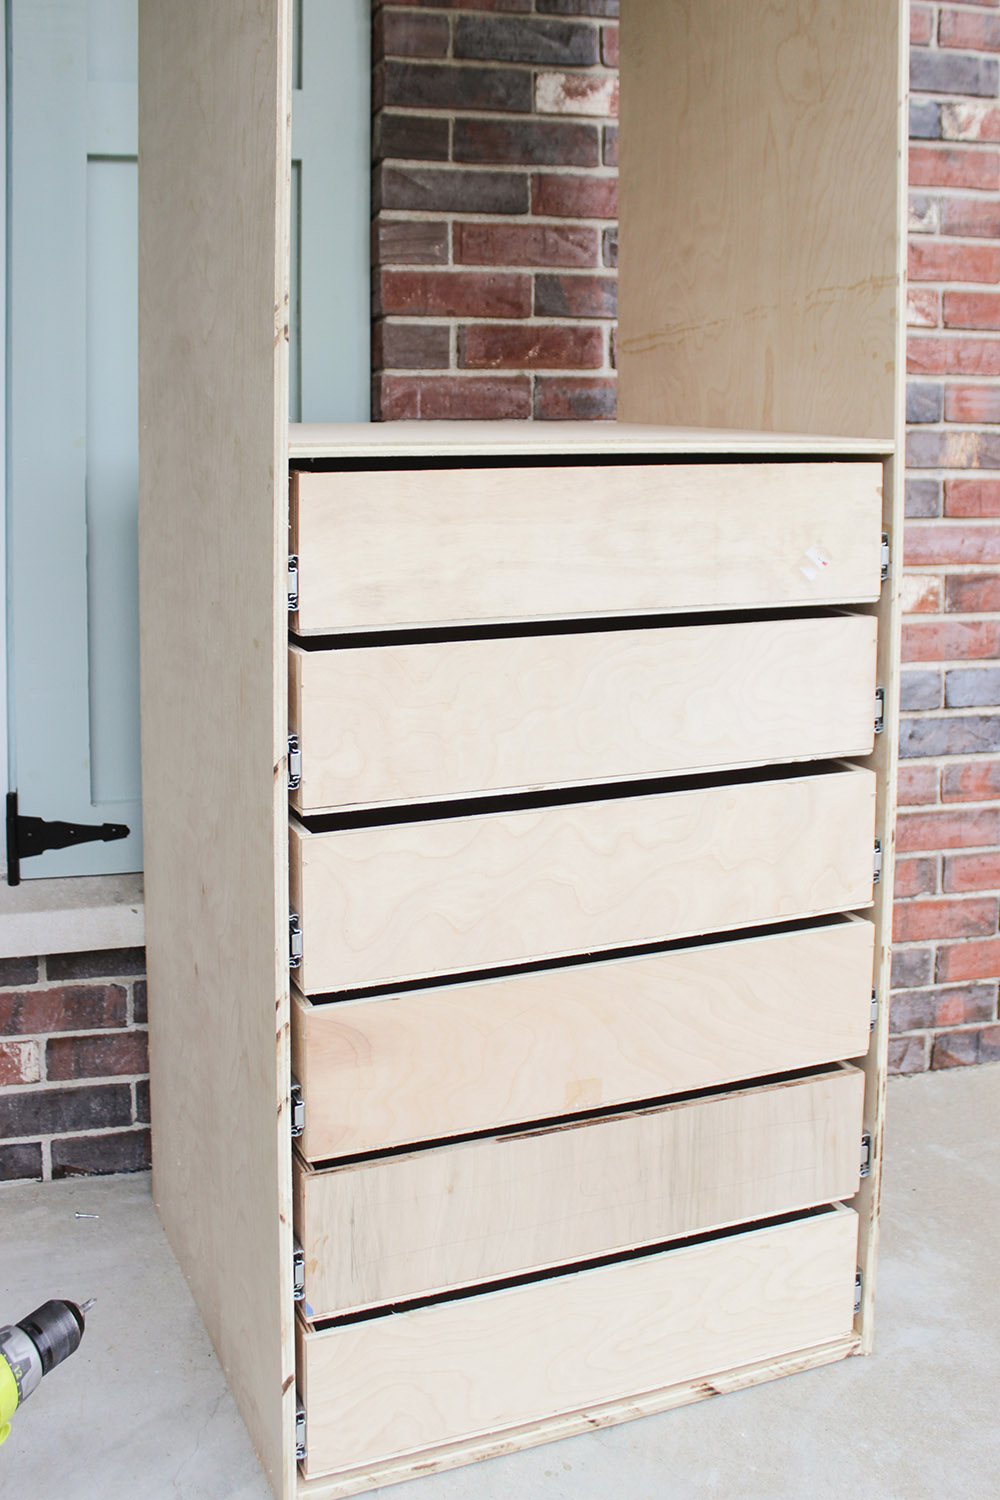
Building The Drawer Boxes
When it comes to creating custom storage solutions, building drawers in a closet can make a world of difference in maintaining organization and maximizing space. One crucial step in this process is constructing the drawer boxes, which involves cutting wood pieces and assembling them. Let’s dive into the key steps involved in building the drawer boxes for your closet.
Cutting Wood Pieces
Start by measuring the dimensions of your closet space to determine the size of your drawers. Use a table saw to accurately cut the pieces of wood according to the measurements. It’s essential to ensure that the pieces are cut precisely to achieve a uniform and professional-looking finish. Take the time to double-check the measurements before making any cuts.
Assembling The Drawer Boxes
- Begin by applying wood glue to the edges of the cut wood pieces, ensuring thorough and even coverage.
- Next, carefully align the pieces to form the rectangular shape of the drawer box. Use clamps to hold the pieces in place while the glue dries.
- Once the glue has set, reinforce the corners by driving screws through the joints, providing added stability and strength to the drawer box.
- Repeat this process for each drawer box, ensuring that they are all constructed with precision and attention to detail.
Installing The Drawer Slides
Installing the drawer slides is an essential step in building drawers in a closet. Proper installation will ensure smooth operation and longevity of the drawers. Let’s dive into the details of measuring and mounting the slides, as well as attaching them to the drawers.
Measuring And Mounting The Slides
Before you begin, ensure that the slide length is appropriate for the depth of your drawer, and that the slides are oriented correctly using a measuring tape to guide you.
Attaching Slides To The Drawers
Once you’ve measured and mounted the slides inside the closet, it’s time to attach the slides to the drawers. Start by placing the drawer on a flat surface and aligning the drawer slide, then secure it with screws.

Credit: www.youtube.com
Mounting The Drawer Boxes
To mount the drawer boxes in a closet, begin by aligning and securing the slides inside the cabinet. Next, attach the drawer members to the box, ensuring they slide smoothly. Adjust and level the drawers as needed to guarantee they open and close effortlessly within the closet space.
Once you have built the drawer boxes for your closet, the next step is to mount them securely. Proper alignment and smooth operation are crucial for maximizing the functionality and durability of your drawers. In this section, we will discuss how to align and secure the boxes and check for smooth operation.Aligning And Securing The Boxes
To ensure your drawers align perfectly within the closet, follow these steps:- Measure and mark: Start by measuring the height and width of the drawer opening in the closet. Mark these measurements on the sides of the boxes so you know where to position them.
- Align the boxes: Place the first box into the opening, making sure it lines up with the marks you made. Use a level to ensure it is perfectly horizontal. Repeat this step for the remaining boxes.
- Secure the boxes: Once the boxes are aligned, use screws or nails to secure them to the closet walls. Make sure to screw or nail through the sides of the boxes into the closet walls for maximum stability.
Checking For Smooth Operation
After mounting the drawer boxes, it is essential to check for smooth operation to avoid any frustration in the future. Here’s what you need to do:- Open and close the drawers: Test the drawers by opening and closing them several times. They should glide smoothly without any sticking or jamming.
- Check clearance: Ensure that the drawers have enough clearance on all sides to glide without obstruction. Adjust the boxes if needed to allow for adequate clearance.
- Inspect for level alignment: Use a level to check if the boxes are still horizontally aligned after testing the drawers. If necessary, make adjustments to achieve a level position.
- Verify stability: Shake the drawers slightly to check for any wobbling or instability. If you notice any issues, reinforce the mounting points or adjust the boxes to ensure they are securely fastened.
Finishing Touches
Completing the drawer installation project with precision and attention to detail is crucial. Here are the final steps:
Applying A Finish To The Drawers
- Clean the drawers thoroughly with a damp cloth.
- Apply wood finish evenly using a brush or cloth.
- Let the finish dry completely as per instructions.
Adding Drawer Pulls
- Choose drawer pulls that complement your closet design.
- Measure and mark the placement of each pull.
- Secure the pulls in place with screws or hardware provided.

Credit: www.youtube.com
Organizing And Using The Closet Drawers
Arranging Items In The Drawers
Sort items by category like clothing or accessories.
- Use drawer dividers for small items.
- Fold clothes neatly to maximize space.
Maximizing The Storage Space
Utilize vertical space effectively within the drawers.
- Place frequently used items at the front.
- Label or color-code drawers for quick identification.
Frequently Asked Questions On How To Build Drawers In A Closet
How To Measure For Closet Drawers?
To measure for closet drawers, first, assess the available space and consider the drawer dimensions. Then, use a measuring tape to determine the width, depth, and height needed for the drawers.
What Materials Are Best For Building Closet Drawers?
For building closet drawers, wood materials like plywood and MDF are popular choices. These offer durability and can be easily customized to fit the closet space. Consider using hardwood for the drawer fronts for added strength and aesthetic appeal.
What Tools Are Required To Build Closet Drawers?
Essential tools for building closet drawers include a tape measure, saw, drill, screws, wood glue, and drawer slides. These tools facilitate precise cutting, assembly, and attachment of the drawers to the closet framework.
How To Install Drawer Slides In A Closet?
To install drawer slides in a closet, carefully measure and mark the placement for the slides. Then, attach the slides to the drawer and the closet frame, ensuring they are level and aligned for smooth drawer operation.
Conclusion
Building drawers in a closet is a practical and efficient way to enhance storage space and organization. By following the step-by-step process outlined in this blog post, you can easily create custom drawers that perfectly fit your needs. From measuring and cutting the materials to assembling and installing the drawers, this guide has covered all the essential aspects.
So get started on your closet renovation project and enjoy the benefits of a well-organized space.
{ “@context”: “https://schema.org”, “@type”: “FAQPage”, “mainEntity”: [ { “@type”: “Question”, “name”: “How to Measure for Closet Drawers?”, “acceptedAnswer”: { “@type”: “Answer”, “text”: “To measure for closet drawers, first, assess the available space and consider the drawer dimensions. Then, use a measuring tape to determine the width, depth, and height needed for the drawers.” } } , { “@type”: “Question”, “name”: “What Materials Are Best for Building Closet Drawers?”, “acceptedAnswer”: { “@type”: “Answer”, “text”: “For building closet drawers, wood materials like plywood and MDF are popular choices. These offer durability and can be easily customized to fit the closet space. Consider using hardwood for the drawer fronts for added strength and aesthetic appeal.” } } , { “@type”: “Question”, “name”: “What Tools Are Required to Build Closet Drawers?”, “acceptedAnswer”: { “@type”: “Answer”, “text”: “Essential tools for building closet drawers include a tape measure, saw, drill, screws, wood glue, and drawer slides. These tools facilitate precise cutting, assembly, and attachment of the drawers to the closet framework.” } } , { “@type”: “Question”, “name”: “How to Install Drawer Slides in a Closet?”, “acceptedAnswer”: { “@type”: “Answer”, “text”: “To install drawer slides in a closet, carefully measure and mark the placement for the slides. Then, attach the slides to the drawer and the closet frame, ensuring they are level and aligned for smooth drawer operation.” } } ] }