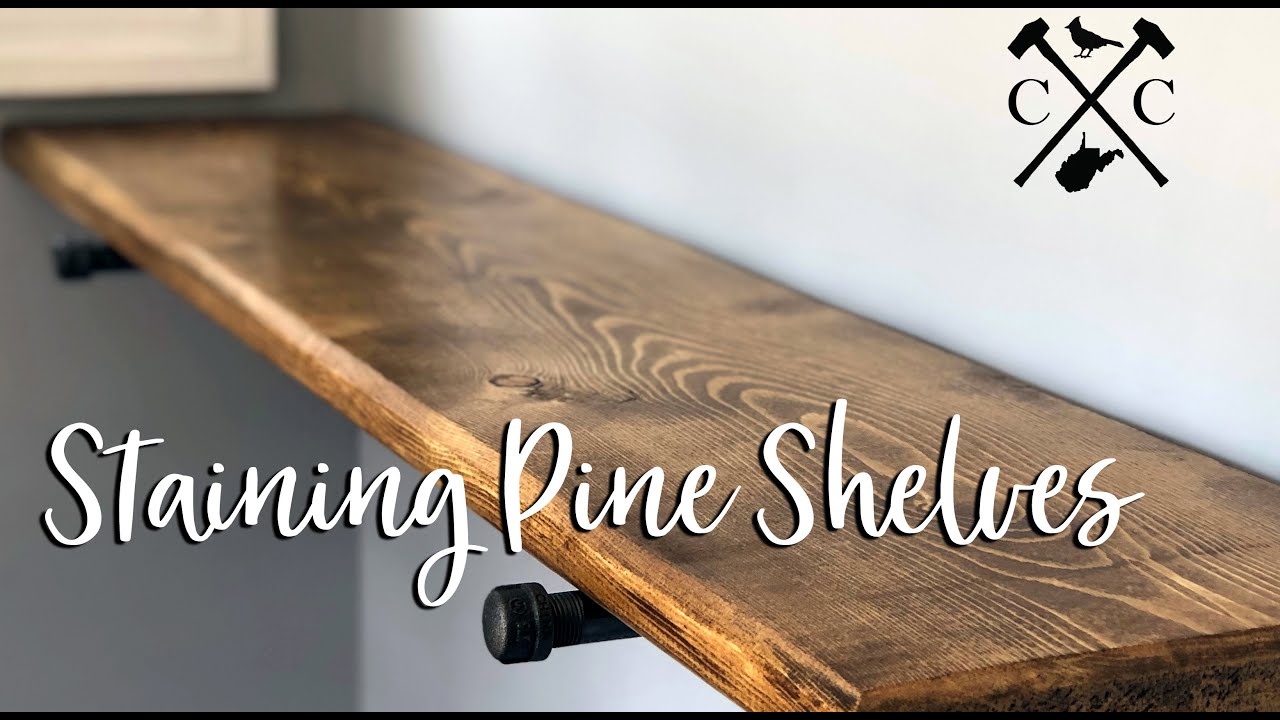
To stain wood shelves, start by sanding them to smooth any rough spots and ensure an even finish. Then, apply wood stain using a brush or cloth, wiping off any excess to achieve the desired color and finish.
Staining wood shelves is a great way to enhance their natural beauty and add a touch of personalization to your space. Whether you are looking to match them to existing furniture or create a new look for your room, staining allows you to achieve the perfect color and finish.
With the right tools and techniques, you can easily transform plain wood shelves into stunning, customized pieces that complement your decor. In this guide, we will walk you through the step-by-step process of staining wood shelves, providing tips and tricks to help you get professional-looking results. Whether you are a seasoned DIY enthusiast or a novice, this comprehensive guide will equip you with the knowledge and skills needed to tackle this project with confidence.
Choosing The Right Stain
Choosing the right stain for your wood shelves is a crucial step in achieving the desired look and protection. Let’s dive into some key considerations to help you make the best choice.
Consider The Wood Type
Different wood types absorb stains differently, affecting the final color and finish.
- Softwoods like pine take stain unevenly due to varying density.
- Hardwoods like oak offer more consistent results with richer hues.
Decide On The Stain Color
Selecting the right stain color is essential for complementing your space and achieving the desired aesthetic.
- Dark stains add drama and sophistication to the wood.
- Light stains create a warm and airy feel in the space.
Credit: buildingourrez.com
Preparing The Wood Shelves
To prepare wood shelves for staining, start by sanding the surface smoothly. Then, wipe the shelves clean to remove any dust or debris. Applying a wood conditioner before staining can help achieve a more even finish.
Sand and smooth the wood shelves to create a clean surface for the stain.Sanding The Shelves
Start by using fine-grit sandpaper to even out any rough areas on the wood.Removing Dust And Debris
Wipe down the shelves with a tack cloth to eliminate any dust particles before staining.Applying The Stain
Applying the Stain
Once you have prepared your wood shelves and chosen the right stain, it’s time to apply the stain. This step is crucial, as it is what will give your shelves that beautiful, rich color and enhance their natural beauty. In this section, we will discuss two methods: using a brush or cloth, and applying multiple coats for a deeper and more saturated color.
Using A Brush Or Cloth
When it comes to applying stain to your wood shelves, you have the option of using a brush or a cloth. Both methods have their advantages, so choose the one that feels more comfortable to you and gives you the best control over the application. Here’s how each method works:
Using a Brush:
Step 1: Start by stirring the stain thoroughly to ensure a consistent color throughout.
Step 2: Dip the brush into the stain, making sure to remove any excess by gently tapping it against the rim of the can.
Step 3: Apply the stain to the wood shelves, brushing in the direction of the wood grain. Use even and smooth strokes for a uniform finish.
Step 4: Work in small sections to prevent the stain from drying out before you can evenly spread it.
Step 5: After applying the stain, use a clean cloth to wipe off any excess and achieve the desired level of saturation.
Step 6: Allow the stain to dry completely before applying additional coats or finishing the shelves.
Using a Cloth:
Step 1: Start by wearing protective gloves to prevent the stain from staining your hands.
Step 2: Pour a small amount of stain onto a clean cloth.
Step 3: Apply the stain to the wood shelves by rubbing the cloth along the grain, ensuring even coverage.
Step 4: As you apply the stain, pay attention to any drips or excess and use another clean cloth to remove them immediately.
Step 5: Continue applying the stain to the entire surface of the wood shelves, working in small sections.
Step 6: Once you have applied the stain, use a clean cloth to wipe off any excess and achieve the desired color intensity.
Step 7: Allow the stain to dry completely before applying additional coats or finishing the shelves.
Applying Multiple Coats
Applying multiple coats of stain can help achieve a deeper and more saturated color. It is important to allow each coat to dry completely before applying the next one. Here’s how to apply multiple coats:
- After the first coat has dried, lightly sand the surface of the wood shelves to remove any roughness or imperfections.
- Once you have sanded the surface, wipe it clean with a soft cloth to remove any dust or debris.
- Apply the second coat of stain using the same method you used for the first coat, whether it be with a brush or a cloth.
- Continue applying coats of stain until you achieve the desired color depth and richness, always allowing each coat to dry fully before moving on to the next one.
- Remember to wipe off any excess stain with a clean cloth after each coat to ensure an even and consistent finish.
- Once you have achieved the desired color, allow the final coat of stain to dry completely before finishing the shelves with a protective sealer or varnish.
By following these steps for applying the stain and considering whether to use a brush or cloth, as well as applying multiple coats if desired, you will be able to transform your wood shelves into stunning pieces that enhance the overall aesthetic of your space.

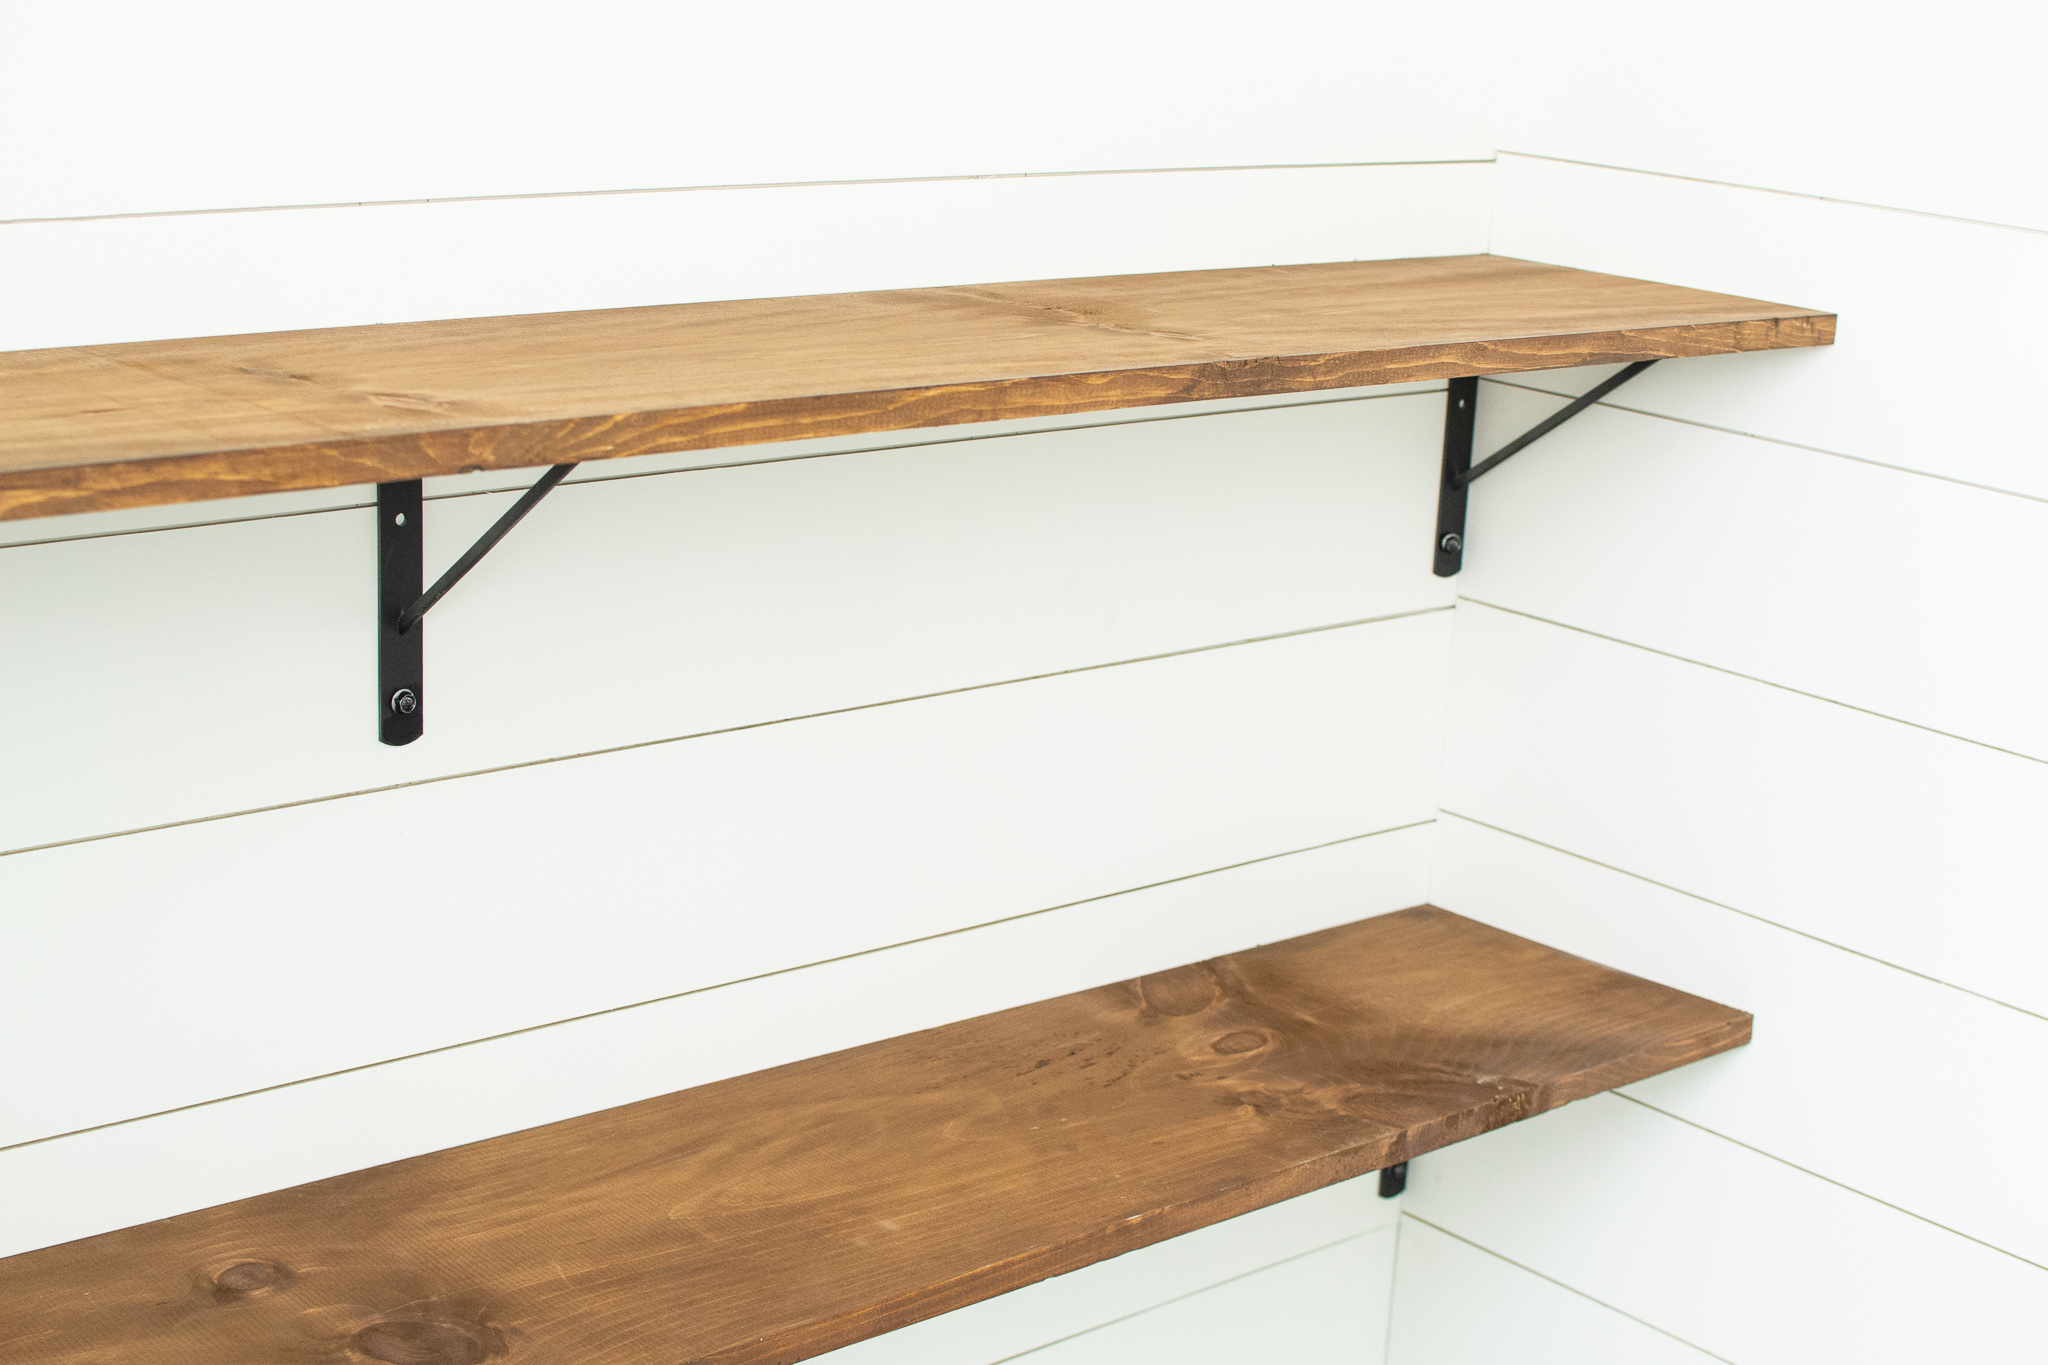
Credit: cardinalcreekwv.com
Allowing The Stain To Dry
Allowing the stain to dry is a crucial step in the wood staining process. It ensures that the stain sets properly and creates a beautiful, long-lasting finish on your wood shelves.
Following The Recommended Drying Time
Once you have applied the stain to your wood shelves, it’s essential to follow the manufacturer’s recommended drying time. This can vary depending on the type of stain and the environmental conditions. In general, oil-based stains may require a longer drying time than water-based stains. Check the product label or instructions for the specific drying time and avoid disturbing the shelves until the recommended period has elapsed.
Creating Adequate Ventilation
Proper ventilation is key to ensuring the stain dries effectively. Ensure that the area where the wood shelves are drying has adequate air circulation. Open windows, use fans, or consider using a ventilation system to help the stain dry evenly and prevent any lingering odors. Ventilation also helps in preventing the formation of mold or mildew on the freshly stained shelves.
Protecting The Stained Shelves
Protecting the Stained Shelves:
After staining your wood shelves, protecting them is essential to maintain their beauty and durability. Here are some key steps to ensure the longevity of your stained shelves.
Applying A Sealant
Applying a sealant is a crucial step in protecting your stained wood shelves from moisture, scratches, and general wear and tear. Choose a high-quality, transparent sealant that is specifically designed for use on stained wood. Carefully read the instructions for application and allow adequate drying time before placing items on the shelves. A proper sealant will help preserve the color and finish of the stained wood while providing a protective barrier against damage.
Using Protective Pads Or Coasters
For items that will be placed directly on the stained wood shelves, such as vases, glasses, or decorative objects, it’s important to use protective pads or coasters. Invest in felt pads or silicone coasters to prevent scratches and marks on the surface of the shelves. Encourage proper use of these protective items to maintain the integrity of the stained finish. Additionally, using coasters for drinks can help prevent water rings on the wood surface, ensuring it stays looking as good as new for longer.
Maintaining The Stained Shelves
Learn how to effectively maintain your stained wood shelves by following simple steps to keep them looking fresh and protected. Proper care and periodic maintenance will enhance the longevity and appearance of your stained shelves, ensuring they always look their best.
How to Maintain Stained Shelves To keep your stained wood shelves looking their best and extending their lifespan, regular maintenance is essential. In this post, we will discuss two important aspects of maintaining stained shelves: regular cleaning and dusting, and repairing scratches or damage. By following these simple steps, you can ensure your stained shelves stay beautiful and functional for years to come. Regular Cleaning and Dusting Regular cleaning and dusting are crucial to prevent the accumulation of dirt and debris on your stained wood shelves. Here are some easy steps to help you maintain the cleanliness of your shelves: 1. Dust the Shelves: Using a soft, lint-free cloth or microfiber cloth, gently dust the surface of your stained shelves. Make sure to remove any loose dust or dirt particles. 2. Remove Stubborn Stains: If you notice any stubborn stains or spills on your stained shelves, use a mild cleaning solution. Mix a small amount of gentle dish soap with warm water. Dampen a soft cloth in the solution and gently wipe the stained area. Avoid using abrasive cleaners or scrub brushes, as they can damage the stain or finish. 3. Dry Thoroughly: After cleaning, ensure that your shelves are thoroughly dried to prevent moisture from seeping into the wood. Use a clean, dry cloth to wipe away any excess moisture. 4. Apply Furniture Polish: To restore the shine and protect the stained wood, you can apply a small amount of furniture polish to a clean cloth and gently buff it onto the shelves. This will help maintain the luster of the stain and provide a protective layer. Repairing Scratches or Damage Even with proper care, your stained shelves may accumulate scratches or suffer from minor damage over time. Here are some tips for repairing and restoring the beauty of your stained shelves: 1. Assess the Damage: Inspect the shelves to identify any scratches or damage. Determine the severity of the issue to decide on the appropriate repair method. 2. Minor Scratches: For minor scratches, you can use a touch-up marker or stain pen that matches the color of your shelves. Apply the marker or pen to the scratch, following the direction of the grain, and wipe away any excess with a clean cloth. 3. Moderate Scratches: For deeper scratches, you may need to sand the affected area lightly. Start with fine-grit sandpaper, gently sanding along the direction of the grain. Once the scratch is less noticeable, apply a matching stain to blend it with the surrounding area. Finish by applying a protective coat of clear finish or sealer. 4. Major Damage: For more severe damage, such as deep gouges or significant discoloration, it is best to consult a professional or consider replacing the damaged shelves altogether. Remember, proper maintenance plays a vital role in preserving the beauty and durability of your stained wood shelves. By incorporating regular cleaning and dusting into your routine, as well as addressing any scratches or damage promptly, you can ensure that your shelves remain a beautiful addition to your home or office for a long time to come.
Credit: www.pinterest.com
Frequently Asked Questions Of How To Stain Wood Shelves
What Are The Best Wood Stains For Shelves?
Wood stains like gel stains, water-based stains, and oil-based stains are popular choices for shelves. Gel stains are easy to apply and give a rich color, while water-based stains are low in odor and quick-drying. Oil-based stains offer a durable finish ideal for heavy use shelves.
How To Prepare Wood Shelves For Staining?
Start by sanding the shelves with fine-grit sandpaper to create a smooth surface. Then, clean the shelves to remove any dust and debris. Apply a pre-stain wood conditioner if using a softwood to help the stain absorb evenly. Lastly, ensure the workspace is well-ventilated before beginning the staining process.
What Tools Are Needed For Staining Wood Shelves?
You’ll need basic tools such as sandpaper, a sanding block, a clean cloth, and a paintbrush or foam applicator for applying the stain. It’s also recommended to have wood conditioner, wood stain, and protective finish such as polyurethane for a professional and long-lasting finish.
Can Shelves Be Stained Without Stripping?
Yes, as long as the current finish is in good condition, you can lightly sand the shelves to roughen the surface and remove any gloss. This will allow the new stain to adhere properly without the need for complete stripping.
Always test a small area first to ensure the desired results.
Conclusion
To sum up, staining wood shelves is a simple yet impactful way to enhance the beauty and durability of your furniture. By following the steps outlined in this guide, you can achieve professional-looking results and enjoy a long-lasting finish. Remember to properly prepare the wood, choose the right stain, apply it evenly, and seal the shelves for added protection.
With a little time and effort, you’ll have stunning wood shelves that complement your decor and stand the test of time.
{ “@context”: “https://schema.org”, “@type”: “FAQPage”, “mainEntity”: [ { “@type”: “Question”, “name”: “What are the best wood stains for shelves?”, “acceptedAnswer”: { “@type”: “Answer”, “text”: “Wood stains like gel stains, water-based stains, and oil-based stains are popular choices for shelves. Gel stains are easy to apply and give a rich color, while water-based stains are low in odor and quick-drying. Oil-based stains offer a durable finish ideal for heavy use shelves.” } } , { “@type”: “Question”, “name”: “How to prepare wood shelves for staining?”, “acceptedAnswer”: { “@type”: “Answer”, “text”: “Start by sanding the shelves with fine-grit sandpaper to create a smooth surface. Then, clean the shelves to remove any dust and debris. Apply a pre-stain wood conditioner if using a softwood to help the stain absorb evenly. Lastly, ensure the workspace is well-ventilated before beginning the staining process.” } } , { “@type”: “Question”, “name”: “What tools are needed for staining wood shelves?”, “acceptedAnswer”: { “@type”: “Answer”, “text”: “You’ll need basic tools such as sandpaper, a sanding block, a clean cloth, and a paintbrush or foam applicator for applying the stain. It’s also recommended to have wood conditioner, wood stain, and protective finish such as polyurethane for a professional and long-lasting finish.” } } , { “@type”: “Question”, “name”: “Can shelves be stained without stripping?”, “acceptedAnswer”: { “@type”: “Answer”, “text”: “Yes, as long as the current finish is in good condition, you can lightly sand the shelves to roughen the surface and remove any gloss. This will allow the new stain to adhere properly without the need for complete stripping. Always test a small area first to ensure the desired results.” } } ] }